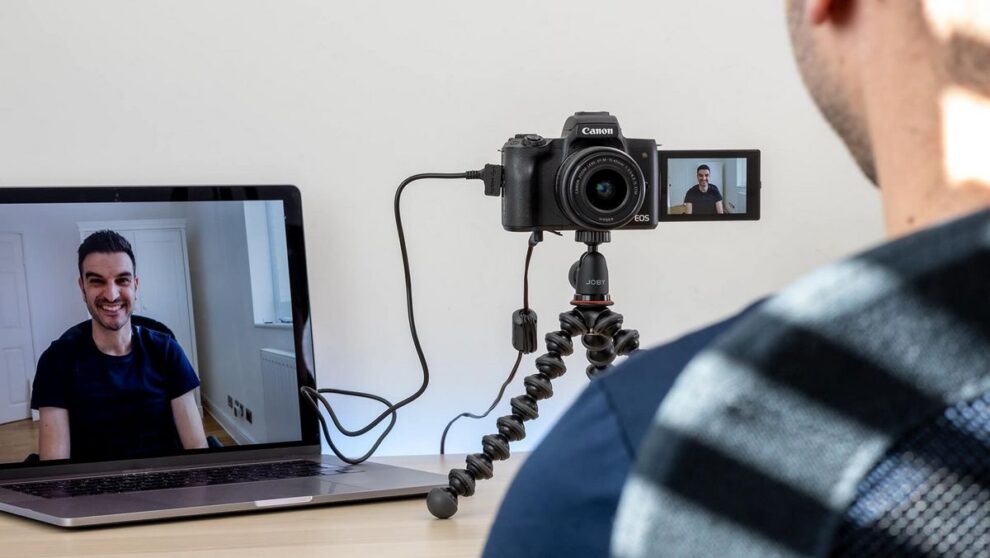
In recent years, video conferencing, live streaming, and content creation have surged in popularity. Whether you’re a professional looking to enhance your virtual meetings, a gamer streaming on platforms like Twitch, or a YouTuber creating high-quality videos, having the right equipment is key. While your computer’s built-in webcam or a standard USB camera can do the job, they often fail to deliver the high-quality video and clarity that a DSLR (Digital Single-Lens Reflex) camera can provide. But did you know you can use your DSLR as a webcam? By using your DSLR camera as a webcam, you can instantly upgrade the video quality of your calls, streams, and recordings. In this blog post, we’ll walk you through how to use a DSLR as a webcam, and cover everything you need to get started.
Why Use a DSLR as a Webcam?
Before diving into the how-to, let’s discuss why you would want to use your DSLR as a webcam in the first place.
- Superior Video Quality: DSLRs have larger image sensors than typical webcams, which translates into better image quality. This allows for clearer and sharper visuals, with better color reproduction, dynamic range, and depth of field.
- Better Lens Control: With a DSLR, you can use interchangeable lenses that give you full control over your focal length, aperture, and depth of field. This is perfect for achieving the “blurry background” (bokeh effect) that many people desire in their content.
- Professional Look: Using a DSLR for video calls or streaming immediately elevates your look, making you appear more professional. It shows that you’re serious about the quality of your content, whether it’s for business or creative purposes.
- Low-Light Performance: DSLRs perform better in low-light conditions compared to regular webcams, making them a great option for late-night streams or recordings in dimly lit environments.
Now, let’s move on to how to use a DSLR as a webcam.
Steps to Use Your DSLR as a Webcam
1. Check Your DSLR’s Compatibility
Not all DSLRs are capable of being used as webcams directly. First, ensure that your camera can support live video output via USB or HDMI. Most modern DSLR models from Canon, Nikon, Sony, and other major brands can do this.
Some popular camera models that support this feature are:
- Canon EOS series (like EOS 80D, EOS 5D Mark IV, and EOS Rebel series)
- Nikon D series (like D850, D7500, and D5600)
- Sony Alpha series (like A7 III, A6400, and A6000)
Check your camera’s manual or the manufacturer’s website to verify whether it supports video output through USB or HDMI.
2. Choose Your Connection Method
To connect your DSLR to your computer, you have two main options: USB and HDMI. Let’s go over both.
- USB Connection: Some DSLR cameras can be connected to your computer via USB and used as a webcam with the help of third-party software. This method is typically simpler, requiring only the camera, a USB cable, and compatible software. However, it may not always offer the best performance, especially if your camera doesn’t have native webcam support.
- HDMI Connection: The HDMI connection provides higher quality video output, as it offers an uncompressed signal from your camera. However, to use this method, you’ll need an HDMI capture card, a device that converts the HDMI signal into a format that your computer can recognize as a webcam input. Popular capture cards include the Elgato Cam Link and AV.io HD.
3. Install Necessary Software
Once you’ve decided on your connection method, you’ll need the right software to make your DSLR work as a webcam. Here are a few popular options:
- Canon EOS Webcam Utility: If you have a Canon DSLR, the Canon EOS Webcam Utility is a free tool that allows you to use your Canon DSLR as a webcam. Simply download and install the software, connect your camera via USB, and select it as the camera source in your video conferencing software.
- Nikon Webcam Utility: Nikon also offers a similar utility for their cameras. This software allows you to use Nikon DSLRs as webcams when connected via USB.
- OBS Studio: OBS (Open Broadcaster Software) is a popular free tool used for live streaming and recording. It supports both USB and HDMI-connected cameras, provided you have the right capture card and software.
- Ecamm Live: If you’re a Mac user, Ecamm Live is a great tool for turning your DSLR into a webcam for video calls, streaming, and recordings.
- Logitech Capture: For webcams and some camera models with HDMI capture, Logitech Capture allows you to integrate your DSLR into streaming platforms like YouTube and Facebook.
4. Set Up Your Camera
Before you start using your DSLR as a webcam, there are a few camera settings you should adjust to ensure the best performance.
- Set Your Camera to Manual Mode: Avoid using automatic settings, as your camera may adjust the exposure or focus unexpectedly during use. Set your DSLR to manual mode to have full control over settings like ISO, aperture, and shutter speed.
- Turn Off Auto Focus: Set your lens to manual focus to prevent it from continuously adjusting during video calls or streams.
- Adjust Your White Balance: Manually set your white balance to avoid color shifts caused by automatic settings. This ensures that the colors in your video look natural.
- Set the Frame Rate and Resolution: If you’re using HDMI, you can typically select 1080p resolution and 30fps or 60fps for smooth, high-quality video.
5. Connect Your DSLR to the Computer
- For USB connection, simply plug your camera into your computer via the USB cable and launch the relevant software (e.g., Canon EOS Webcam Utility or Nikon Webcam Utility). Your DSLR should automatically be recognized as a webcam.
- For HDMI connection, connect your camera to the capture card using an HDMI cable. Then, plug the capture card into your computer via USB. Open your streaming or video conferencing software, and select the capture card as the video input.
6. Test Your Setup
Once your DSLR is connected and recognized by your computer, open your video conferencing or streaming application (Zoom, Skype, OBS, etc.). Select your DSLR as the camera input, and make sure everything looks good. Check for issues like lag, focus, or color accuracy.
If you’re streaming, do a few test recordings to ensure your video looks crisp and the audio is synced.
Tips for Getting the Best Quality
- Use an External Microphone: While your DSLR provides excellent video quality, its built-in microphone may not be up to par. For superior audio, invest in an external microphone such as a shotgun mic or a lapel mic.
- Use a Tripod or Camera Mount: To keep your DSLR steady during calls or streams, use a tripod or camera mount. This prevents shaky footage and helps achieve a more professional setup.
- Ensure Adequate Lighting: Good lighting is essential for great video quality. Invest in softbox lights or ring lights to ensure that your face is well-lit and clear on camera.
- Consider Camera Overheating: Some DSLRs may overheat when used for extended periods, especially when recording or streaming. To avoid this, keep your camera in a well-ventilated area, and if necessary, invest in an external fan or cooling device.
Conclusion
Using your DSLR as a webcam is a game-changer when it comes to improving the quality of your video calls, streams, and recordings. The crisp detail, professional look, and overall video enhancement make it a worthwhile investment for anyone serious about content creation or virtual communication. With the right equipment, software, and setup, you can easily turn your DSLR into a webcam and take your video content to the next level. Happy streaming, and enjoy the improved video quality!


